Finding the perfect balance in *Monster Hunter Wilds* can be challenging, given the tradeoffs associated with armor, Talismans, and other gear. Yet, when it comes to combat, the Sword and Shield stands out for its versatility, offering both offensive and defensive capabilities. Here’s a comprehensive guide on maximizing the potential of your Sword and Shield in *Monster Hunter Wilds*.
Sword and Shield in Monster Hunter Wilds
The Sword and Shield is a reliable choice for both beginners and seasoned hunters, thanks to its exceptional mobility, damage potential, and ability to guard. It's a versatile weapon that can get you out of sticky situations and right back into the fray.
All Moves
| Command | Move | Description |
|---|---|---|
| Triangle/Y | Standard Attack | A basic sword attack that can be chained for a 4-hit combo. Use the analog stick mid-combo to adjust your positioning. |
| Circle/B | Special Attack | Use the analog stick with Circle/B to perform a Shield Attack that deals stun damage. Press Circle/B for a powerful Lateral Slash. |
| Triangle/Y + Circle/B | Advancing Slash | An upward slash performed while advancing forward. Using it while sliding downhill or towards a ledge enables a terrain-specific attack. |
| Triangle/Y + Circle/B (During Combo) | Roundslash | An attack that slashes a wide area, allowing quick directional changes. Chain it from certain attacks to execute the powerful Spinning Reaper. |
| Holding down Triangle/Y + Circle/B (During Combo) | Charged Chop | A powerful leaping attack. Hitting a monster's soft spot can cause multiple damage instances. The attack's power increases if used after certain moves. |
| Forward on analog stick + Circle/B | Shield Attack | Use the shield to bash into enemies, dealing stun damage when targeting the head. |
| Push back analog stick + Circle/B (During Combo) | Backstep | Backstep during combos to evade monster attacks. Press Triangle/Y during a Backstep to perform Perfect Rush, a multi-hit attack that inflicts elemental damage and ailments. Press Triangle/Y when the sword flashes for increased damage. |
| Circle/B During Backstep | Charged Slash | Landing a Charged Slash after a Backstep allows you to jump high. While airborne, follow up with aerial attacks like Jumping Slash (Triangle/Y) or Falling Bash (Circle/B). |
| Hold down R2/RT | Guard | Guard against attacks with your shield. A well-timed guard results in a Perfect Guard. Follow up with Triangle/Y for a quick and powerful Counter Slash. |
| R2/RT + Triangle/Y | Sliding Swipe | An easy-to-perform attack that closes the distance to your target quickly. |
| R2/RT + Square/X | Use Item | Use certain items while your weapon is unsheathed. |
| L2/LT + R1/RB | Focus Strike: Vital Stab | A stabbing attack effective against wounds. After hitting wounds or weak points, press Triangle/Y for a Falling Slash or Circle/B for an Upswing Bash. |
Combos
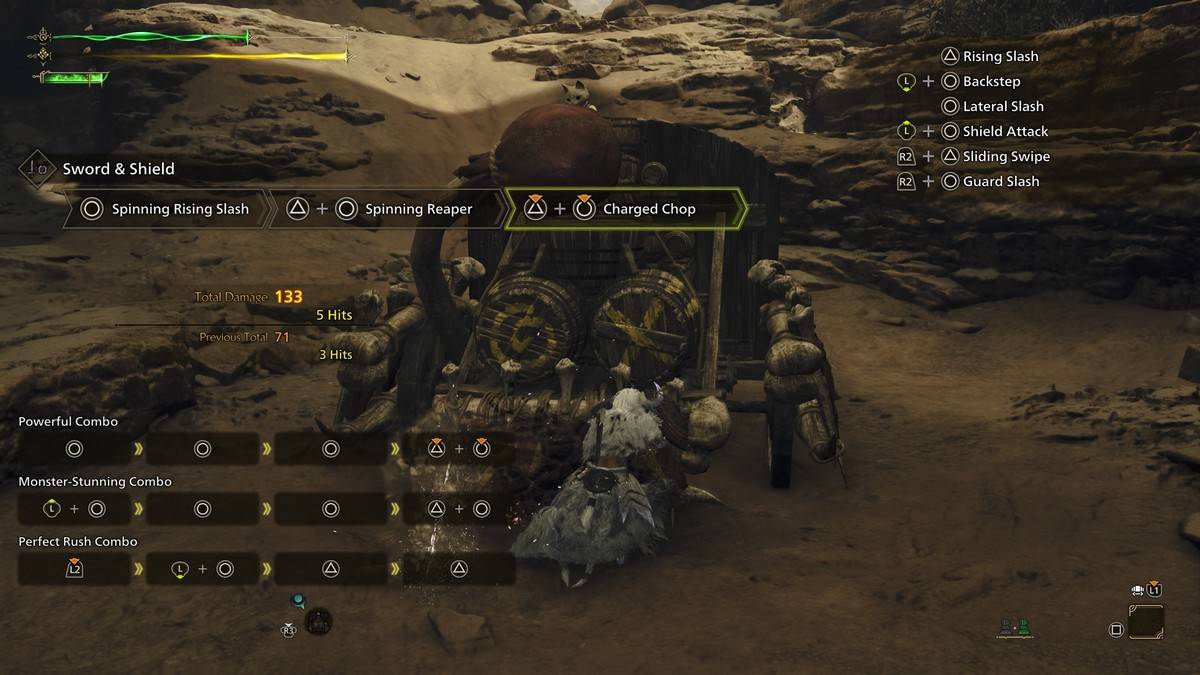 Image Source: Capcom via The Escapist
For players aiming to deal significant damage while maintaining agility, mastering key Sword and Shield combos is essential.
Lateral Slash Combo
The Lateral Slash combo can be amplified with the Spinning Reaper and Charged Chop. Begin with a Lateral Slash (Circle/B), followed by Return Stroke (Circle/B), Spinning Rising Slash (Circle/B), then transition into Spinning Reaper (Triangle/Y + Circle/B) and finish with Charged Chop (Hold Triangle/Y + Circle/B).
This combo delivers swift and potent strikes without locking you into a long animation, enabling quick adjustments during battle.
Shield Bash Combo
To knock down your target, utilize the Shield Attack combo. Initiate by moving the analog stick forward and pressing Circle/B, followed by two more Circle/B inputs, and conclude with a Guard Slash (R2/RT + Circle/B).
This combo is most effective when targeting the monster's head, often causing knockdowns after a few repetitions.
Perfect Rush Combo
The Perfect Rush combo is the Sword and Shield's most formidable sequence. Start with any attack, then Backstep (Push back analog stick + Circle/B), followed by Leaping Slash (Triangle/Y), Perfect Rush (Triangle/Y), Scaling Slash (Triangle/Y), and finish with Falling Bash (Circle/B).
Timing is crucial for maximizing damage. Watch for the red flash on your hunter during Backstep, Leaping Slash, and Perfect Rush to enhance damage output and avoid button mashing.
Sword and Shield Tips
 Image Source: Capcom via The Escapist
Leverage the Sword and Shield's quick movement and dual capabilities with these tips:
Vary Your Attacks
To efficiently bring down monsters, mix fast sword attacks to build elemental damage with shield attacks for stun damage, capitalizing on opportunities to topple your foes.
Dodging and Guarding
In defensive situations, master the art of Guarding and Backstep. Perfect Guards can negate incoming damage, while Power Clashes can push monsters back. Use Backstep to evade and set up immediate counterattacks, honing your timing and positioning skills.
Focus Strikes
As you inflict more wounds on monsters, use Focus Strike to maximize damage. The Sword and Shield allows for two follow-up attacks: Falling Slash for multiple hits or Upswing Bash, which can transition into Falling Bash for increased stun damage.
Item Usage
A unique advantage for Sword and Shield users in *Monster Hunter Wilds* is the ability to use items without sheathing your weapon. This feature can swiftly restore health or support allies, maintaining relentless pressure on your targets.
That’s everything you need to know about effectively using the Sword and Shield in *Monster Hunter Wilds*. For more tips and strategies, be sure to explore The Escapist's resources.
*Monster Hunter Wilds is available now on PlayStation, Xbox, and PC.*